Breaking

Showing posts with label docker. Show all posts
January 08, 2024

How to Setup Docker Containers as Build Agents for Jenkins

In the realm of DevOps, orchestrating seamless workflows is imperative, and Jenkins, with its extensibility, stands out as a powerhouse. 

In this comprehensive tutorial, we will delve into the integration of Docker and SSH for Jenkins agents, providing a step-by-step guide to enhance your CI/CD pipelines. You can see the previous guide, namely setup Jenkins on Kubernetes


Learn how to integrate Docker and SSH to set up a Jenkins agent for continuous integration and deployment (CI/CD) pipelines in this comprehensive tuto


Prerequisites 

Before embarking on this journey, ensure you have the following prerequisites in place:


  1.      A Jenkins server up and running.

 2.     Docker installed on both the Jenkins server and the machine you intend to use as a Docker host.

 3.     SSH access configured between the Jenkins server and the Docker host.

 4.    Java should be installed on your agent server.


Step 1: Set Up Jenkins


Open your Jenkins dashboard and navigate to "Manage Jenkins."


New code button in settings page. Access it through Jenkins dashboard by navigating to "Manage Jenkins."

Click on "Manage Nodes "


Settings page with new code button. Access additional options by clicking 'Manage Nodes'


Select "New Node" to create a new Jenkins agent.

 New code button in settings page. Click "New Node" to create a Jenkins agent.


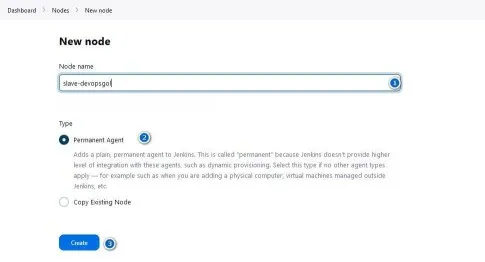
Provide a name for the agent and choose "Permanent Agent."


'New code button in settings page: Name agent and select "Permanent Agent


In the configuration, specify the following:


New code button in settings page. Remote root directory: Choose directory for launching Jenkins agents.


•        Remote root directory: Choose a directory on the Docker host where Jenkins agents will be launched.

•        Labels: Assign labels to the agent for identification.


Related Article :  HOW TO INSTALL AND USE DOCKER : Getting Beginner


Select Manage Jenkins --> Credentials --> system --> Global unrestricted --> add credentials 


New code button in settings page. Accessible via Manage Jenkins --> Credentials --> system --> Global unrestricted --> add credentials.'


Input username and  password  for docker host. Example for user jenkins 


Input the ip addres of the  docker host


Note :

  • Usage : Select Usage this is node much as possible  for node ssh
  • Lauch Method : Select agent ssh for add node  docker with ssh agent
  • Host  :  Input IP ADDRESS OR Hostname Docker Host 
  • Credentials :   Select Credentials for docker host. 

 Save the configuration.

Related Articel :  How to Install Kubernetes on Ubuntu 20.04

Step 2 : Create user  jenkins  and install java for docker host


Add user jenkins in docker host

#  adduser jenkins


Add entri file  below this paragraph  in visudo

# Allow members of group sudo to execute any command
%sudo   ALL=(ALL:ALL) ALL
jenkins ALL=(ALL) NOPASSWD: ALL
# See sudoers(5) for more information on "@include" directives:


Install package java for  requiretment jenkins agent 


# sudo apt install default-jre -y


Verify java version 


# java --version
openjdk 11.0.21 2023-10-17
OpenJDK Runtime Environment (build 11.0.21+9-post-Ubuntu-0ubuntu122.04)
OpenJDK 64-Bit Server VM (build 11.0.21+9-post-Ubuntu-0ubuntu122.04, mixed mode, sharing)


Step 3 :  Install Docker  Plugin


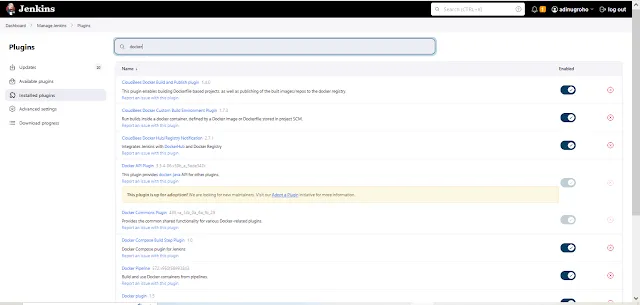
In the Jenkins dashboard, navigate to "Manage Jenkins" > "Manage Plugins." >> Select Plugins --> Install

New code button in settings page for installing Docker plugin using Jenkins

Select  Plugin this below : 

CloudBees Docker Build and Publish plugin Version 1.4.0

CloudBees Docker Custom Build Environment Plugin Version 1.7.3

CloudBees Docker Hub/Registry Notification Version 2.7.1

Docker


Step 4:  CI/CD : Automation Deploy Application HTML Using Jenkins

Fantastic! Adding a Docker node is a great step. Now, let's dive into deploying that simple HTML application via Jenkins. Here's a brief guide for you:

Prerequisites 

  1. Docker Hub 
  2. Jenkins Server is running 
  3. Dockerfile
  4. Jenkinsfile
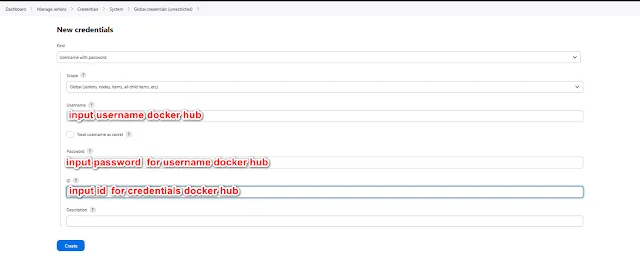
Absolutely, adding Docker Hub credentials to Jenkins is a smart move for secure and seamless integration.

New code button in settings page for adding Docker Hub credentials.

Add  Credentials for docker hub 

New code button in settings page. Add Credentials for docker hub.

Example Dockerfile  


FROM nginx:latest
COPY ./html/. /usr/share/nginx/html/.
EXPOSE 80


Example Jenkinsfile 


pipeline {
    agent any
    stages{
        stage("checkout"){
            steps{
                checkout scm
            }
        }

        stage("Build Image"){
            steps{
                sh 'sudo docker build -t webserver-devopsgol-betahjomblo:1.0 .'
            }
        }
        stage('Docker Push') {
            steps {
                withCredentials([usernamePassword(credentialsId: 'docker_cred', passwordVariable: 'DOCKERHUB_PASSWORD', usernameVariable: 'DOCKERHUB_USERNAME')]) {
                    sh 'sudo docker login -u $DOCKERHUB_USERNAME -p $DOCKERHUB_PASSWORD'
                    sh 'sudo docker tag webserver-devopsgol-betahjomblo:1.0 adinugroho251/webserver-devopsgol-betahjomblo:1.0'
                    sh 'sudo docker push adinugroho251/webserver-devopsgol-betahjomblo:1.0'
                    sh 'sudo docker logout'
                }
            }
        }

      stage('Docker RUN') {
          steps {
           sh 'sudo docker run -d -p 80 --name webserver-betahjombloterus  adinugroho251/webserver-devopsgol-betahjomblo:1.0'
      }
    }
 }
}


For detail  projects simple html : https://github.com/devopsgol/apps-html


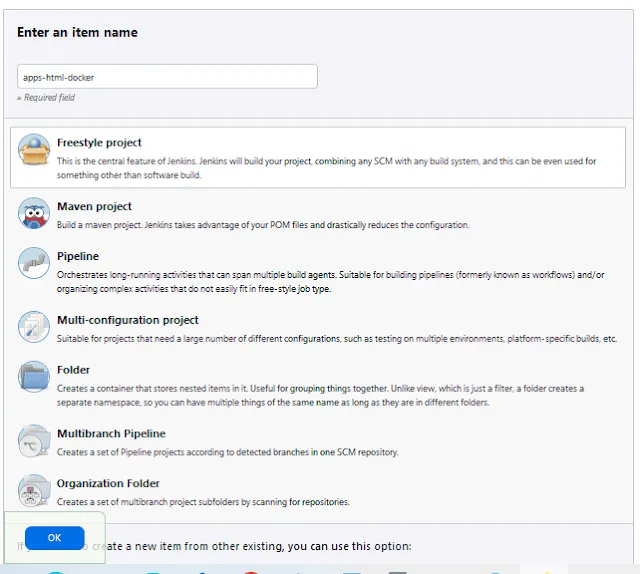
Add Job in Jenkins  for CI/CD 

Add Job in Jenkins


Select Restrict where this project can be run  for remote docker host  and input label docker agent ssh. 

Select Restrict where this project can be run  for remote docker host  and input label docker agent ssh.

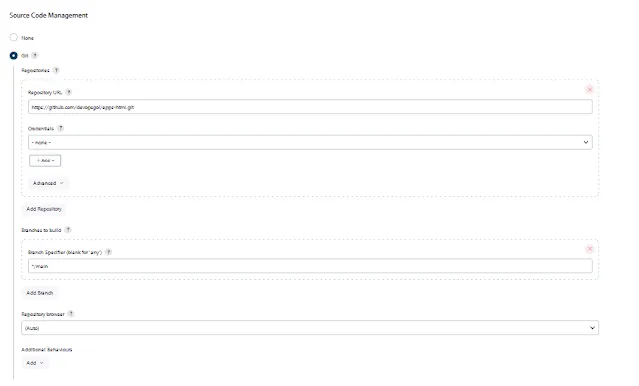
Select Source code Manangement  and  input source code project. example for a github.
Source code Manangement

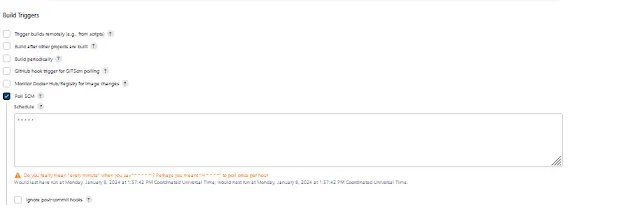
Checklist  Pool  SCM  for automation deploy using jenkins. When there's a code change from the Source Code Management (SCM) like GitHub or the latest commit changes, Jenkins will trigger to perform the build and deploy.


Pool  SCM  for automation deploy using jenkins. When there's a code change from the Source Code Management (SCM) like GitHub or the latest commit changes, Jenkins will trigger to perform the build and deploy.

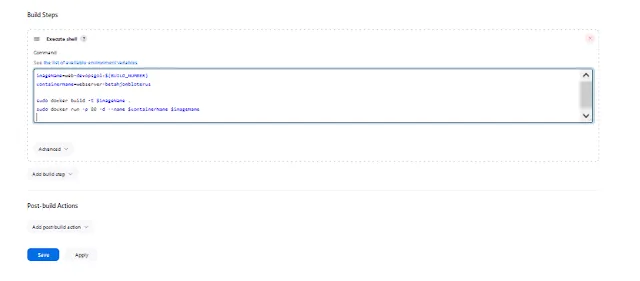
Select  Build Steps --> Execute Shell 


Certainly! Here's the command to build the container:

imageName=web-devopsgol:${BUILD_NUMBER}
containerName=webserver-betahjombloterus 

sudo docker build -t $imageName .
sudo docker run -p 3000:3000 -d --name $containerName $imageName


Build Steps
Save Configuration  

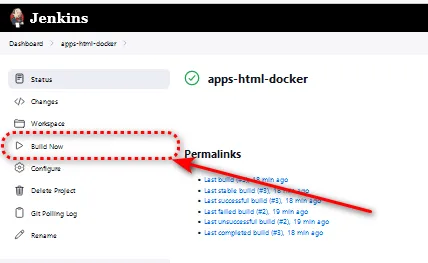
Click Build Now  for running is job

Build now  is running job

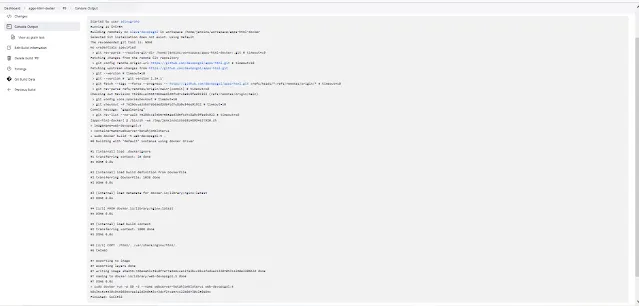
Logs for job pipelines jenkins

Logs for job pipelines jenkins

Alhamdulilah container is running and successfuly curl in services application. 

Container is running well

Conlusion 

Congratulations! You have successfully integrated Docker and SSH for Jenkins agents, enhancing the scalability and flexibility of your CI/CD pipelines.

If you want to read more insightful tutorials and articles related to DevOps, feel free to visit The Insider's Views.


December 29, 2023

HOW TO INSTALL AND USE DOCKER : Getting Beginner


Docker, a term that might still sound unfamiliar to many, is becoming increasingly crucial in the realm of technology. 


how  to install and use docker for beginner

In this article, we will delve into Docker from the basics to becoming proficient.

Let's embark on our journey into the world of containerization with a deep understanding of Docker for beginners.


What is Docker?


Before we go any further, let's collectively understand what Docker actually is.


For beginners, Docker is an open-source platform that allows developers to package, ship, and run applications using containers.


These containers help ensure that applications run consistently across various environments.


Benefits of Using Docker for Beginners


It is essential for beginners to grasp the benefits of using Docker. From space efficiency to ensuring application portability, Docker provides a range of advantages that make it worthwhile to learn.

1.   Space Efficiency:

Docker enables users to package all application dependencies into a container, reducing file size and making application management more efficient.

   2. Incredible Portability:

One of the many reasons people switch to Docker is its incredible portability. Containerized applications can run in various environments without worrying about configuration.


Prasyarat

 To follow this tutorial, you'll need the following:

  • Ubuntu 20.04 server configured by following the initial server setup guide for Ubuntu 20.04, including firewall configuration and a non-root sudo user.
  • An above account is required Docker Hub if you want to create your own image and upload it to Docker Hub, as demonstrated in steps 7 and 8.


Step 1  - Install Package Docker


The Docker package is available in the official Ubuntu repositories but may not be the latest version. To get the latest Docker packages, we recommend using the official Docker repository.

To do this, we will add the latest package source, add the Docker GPG key to ensure valid downloads, then install the package.


First, update your existing package list;

~# sudo apt update


Moving on, install some prerequisite packages using the apt command.:


# sudo apt install apt-transport-https ca-certificates curl software-properties-common


Add the GPG key from the Docker official repository to your operating system.


# curl -fsSL https://download.docker.com/linux/ubuntu/gpg | sudo gpg --dearmor -o /usr/share/keyrings/docker-archive-keyring.gpg


Add repository docker 

# echo "deb [arch=$(dpkg --print-architecture) signed-by=/usr/share/keyrings/docker-archive-keyring.gpg] https://download.docker.com/linux/ubuntu $(lsb_release -cs) stable" | sudo tee /etc/apt/sources.list.d/docker.list > /dev/null


After adding the repository, update all your packages first.


# sudo apt update

Hit:1 http://archive.ubuntu.com/ubuntu jammy InRelease

Hit:2 https://download.docker.com/linux/ubuntu jammy InRelease

Reading package lists... Done

Building dependency tree... Done


Now, installing package docker


$ sudo apt install docker-ce docker-ce-cli containerd.io docker-buildx-plugin docker-compose-plugin -y


Once you've successfully installed , you can verify it using the command docker version.


# docker version

Client: Docker Engine - Community

 Version:           24.0.7

 API version:       1.43

 Go version:        go1.20.10

 Git commit:        afdd53b

 Built:             Thu Oct 26 09:07:41 2023

 OS/Arch:           linux/amd64

 Context:           default


Server: Docker Engine - Community

 Engine:

  Version:          24.0.7

  API version:      1.43 (minimum version 1.12)

  Go version:       go1.20.10

  Git commit:       311b9ff

  Built:            Thu Oct 26 09:07:41 2023

  OS/Arch:          linux/amd64

  Experimental:     false

 containerd:

  Version:          1.6.26

  GitCommit:        3dd1e886e55dd695541fdcd67420c2888645a495

 runc:

  Version:          1.1.10

  GitCommit:        v1.1.10-0-g18a0cb0

 docker-init:

  Version:          0.19.0

  GitCommit:        de40ad0


After successfully installing Docker, you can check whether the Docker service is running or not. You can use the command systemctl for this.


$ sudo  systemctl status docker.service | grep active

     Active: active (running) since Sun 2023-12-24 10:46:10 UTC; 3min 3s ago


To ensure that the Docker service starts automatically when the server restarts, you can follow the command below:


$ sudo systemctl enable docker

Synchronizing state of docker.service with SysV service script with /lib/systemd/systemd-sysv-install.

Executing: /lib/systemd/systemd-sysv-install enable docker


Related Article : Navigating the DevOps Landscape: A Journey Through Essential Tools


Step 2 :  Use Command Docker without sudo


By default, Docker commands can only be executed by the root user or a user who has been added to the docker group. If you want to avoid typing sudo every time you run a Docker command, you can add your user to the docker group.


$  sudo usermod -aG docker username

$ newgrp docker

After successfully adding your user to the docker group, you can perform verification.


# sudo su  $username

$ groups

Docker


Step 3 :  Using Docker Command

Docker involves passing a series of options from a command followed by arguments. You can use the following command:


$ docker {option] [command] [argument]

You can see the docker command


$ docker help

Commands:

  attach      Attach local standard input, output, and error streams to a running container

  commit      Create a new image from a container's changes

  cp          Copy files/folders between a container and the local filesystem

  create      Create a new container

  diff        Inspect changes to files or directories on a container's filesystem

  events      Get real time events from the server

  export      Export a container's filesystem as a tar archive

  history     Show the history of an image

  import      Import the contents from a tarball to create a filesystem image

  inspect     Return low-level information on Docker objects

  kill        Kill one or more running containers

  load        Load an image from a tar archive or STDIN

  logs        Fetch the logs of a container

  pause       Pause all processes within one or more containers

  port        List port mappings or a specific mapping for the container

  rename      Rename a container

  restart     Restart one or more containers

  rm          Remove one or more containers

  rmi         Remove one or more images

  save        Save one or more images to a tar archive (streamed to STDOUT by default)

  start       Start one or more stopped containers

  stats       Display a live stream of container(s) resource usage statistics

  stop        Stop one or more running containers

  tag         Create a tag TARGET_IMAGE that refers to SOURCE_IMAGE

  top         Display the running processes of a container

  unpause     Unpause all processes within one or more containers

  update      Update configuration of one or more containers

  wait        Block until one or more containers stop, then print their exit codes

To be able to view information about Docker system-wide, you can use the following command: 


$ docker info 

Let's explore some of these commands. We will start learning with pictures.

Step 4 :  Use Docker Images


Docker containers are created from Docker images. By default, Docker pulls images from Docker Hub as a Docker registry managed by Docker.  Anyone can host their Docker images on Docker Hub. Most applications and Linux distributions you need have images stored there.

To check if you can access and download images from Docker Hub, enter:


$ docker pull ubuntu

Using default tag: latest

latest: Pulling from library/ubuntu

a48641193673: Pull complete

Digest: sha256:6042500cf4b44023ea1894effe7890666b0c5c7871ed83a97c36c76ae560bb9b

Status: Downloaded newer image for ubuntu:latest

docker.io/library/ubuntu:latest


Initially, Docker couldn't find the local ubuntu image so it downloaded the image from Docker Hub, which is the default repository. Once the image is uploaded, Docker creates a container from the image and the application inside that container runs and displays a notification.

Run the following command to download the official Ubuntu image to your computer:


:~$ docker image ls

REPOSITORY   TAG                IMAGE ID       CREATED       SIZE

ubuntu       latest             174c8c134b2a   12 days ago   77.9MB


As you'll see later in this guide, the image you use to run your container can be modified and used to create a new image, which can then be uploaded (push is the technical term). algorithm) to Docker Hub or other Docker registries.


Let's take a closer look at how to run containers.

Step 5 : Running a Docker Containers


 The Ubuntu container you ran in the previous step is an example of a container that runs and exits after issuing a test message.  Containers can be much more useful than that, and they can be interactive. After all, they are similar to virtual machines but are more resource efficient.


For example, let's run a container using the latest Ubuntu image. Combining the -i and -t switches will give you interactive access to the shell in the container:


$ docker run -it ubuntu /bin/bash

Your command prompt will change to reflect the fact that you are now working inside the container and will look like this:


Output

root@837150bda6c1:/#

Note the container ID in the command prompt. In this example it is 837150bda6c1. You will later need this container ID to identify the container when you want to delete it. Now you can run any command inside the container. For example, check os-release inside the container:


root@837150bda6c1:/# uname -a

Linux 837150bda6c1 5.15.0-69-generic #76-Ubuntu SMP Fri Mar 17 17:19:29 UTC 2023 x86_64 x86_64 x86_64 GNU/Linux

root@837150bda6c1:/# cat  /etc/os-release

PRETTY_NAME="Ubuntu 22.04.3 LTS"

NAME="Ubuntu"

VERSION_ID="22.04"

VERSION="22.04.3 LTS (Jammy Jellyfish)"

VERSION_CODENAME=jammy

ID=ubuntu

ID_LIKE=debian

HOME_URL="https://www.ubuntu.com/"

SUPPORT_URL="https://help.ubuntu.com/"

BUG_REPORT_URL="https://bugs.launchpad.net/ubuntu/"

PRIVACY_POLICY_URL="https://www.ubuntu.com/legal/terms-and-policies/privacy-policy"

UBUNTU_CODENAME=jammy

root@837150bda6c1:/#

Let's take a closer look at how to use external storage local.


Related Article : How to Install Kubernetes on Ubuntu 20.04


Step 6 :  Use External Storage


By default, data in Docker containers is not persistent. This means that when the container is destroyed, so is the data. There may be cases where you want to retain data beyond the life of the container, and this can be achieved using persistent data storage. 

The two persistent data storage options available with Docker are volumes and link mounts.

Volumes are preferred for persistent data management because it is created and managed by Docker , thus separate from the core functionality of the server.  
Volumes can be stored in a Docker-managed portion of the host file system (/var/lib/docker/volumes/), on remote servers, or on cloud providers, and yield better performance than linked drives.


With linked drives, data on the server is mounted into a container. This process relies heavily on the host having a specific file structure, thus providing limited functionality compared to volumes. 
In the next sections, we will create volumes, Move data to these drives and mount or attach the drives to the enclosure.

 Create file example  for test storage persistent docker 

# echo "Bismillah test storage internal local by devopsgol" >>  /data/storage/storageinternal.txt

Running container with mounting the directory above on {mnt}


$ docker run -it  -v /data/storage:/mnt ubuntu /bin/bash

root@aaf57b77fbfd:/# df /mnt

Filesystem     1K-blocks  Used Available Use% Mounted on

/dev/vdb        51290592    32  48652736   1% /mnt

Output 


root@aaf57b77fbfd:/# cat  /mnt/storageinternal.txt

Bismillah test storage internal local by devopsgol

root@aaf57b77fbfd:/#

Let's take a closer look at how to use external storage NFS


Step 7 :  Use External Storage ( NFS ) 

So, you've decided to dive into the vast ocean of Docker, and now you're wondering how to hook up external storage using NFS, huh? Well, buckle up, my friend, because I'm about to guide you through this wild ride in the simplest way possible!

Setting the Stage

Before we get our hands dirty, make sure you have Docker installed and a basic understanding of what NFS is. Now, let's roll!

Step 1: Install NFS-Server

First things first, Install nfs-server and  configured path nfs

 #  sudo apt-get install nfs-kernel-server

 #  mkdir  -p  /data/storage/nfs

 #  sudo mkdir  -p /nfs-devopsgol

 #  sudo mount  /data/storage/nfs/ /nfs-devopsgol/

 #  mount /dev/vdb /nfs-devopsgol/

 #  sudo systemctl restart nfs-server.service

 #  sudo systemctl status nfs-server.service

Configure path storage  for nfs-share 

sudo nano /etc/exports

/nfs-devopsgol 10.20.40.0/24(rw,sync,no_subtree_check)

Step 2 : Create Docker volume

Generate docker  volume with nfs-server  

$ docker volume create --driver local \

 --opt type=nfs \

--opt o=addr=10.20.40.45,rw \

 --opt device=:/nfs-devopsgol \

 devopsgol-volume-semoga-berhasil-nfs

Output  after generate  docker  volume nfs-server 

$ docker  volume  ls  |  grep volume

local     devopsgol-volume-semoga-berhasil-nfs

Create a container  for  testing docker  volume  whit storage nfs 

$ docker run -d -p 80 -it   --name web-devopsgol69   --mount source=devopsgol-volume-semoga-berhasil-nfs,target=/data webserver-nginx-devopsgol

c12ca37057acd9063da191503b8ba1ce7c82ca46dde915ba2ed8b0a3db05ad8d

Container is running well

CONTAINER ID   IMAGE                       COMMAND                  CREATED          STATUS          PORTS                                     NAMES

c12ca37057ac   webserver-nginx-devopsgol   "/usr/sbin/apachectl…"   16 minutes ago   Up 16 minutes   0.0.0.0:32996->80/tcp, :::32996->80/tcp   web-devopsgol69

Access the container by logging in. Execute the 'touch' command to create a file. The file should be created at the specified path, which is /data. The testing is specifically for checking the functionality of the NFS (Network File System) storage.

$ docker exec -it c12ca37057ac  /bin/bash

root@c12ca37057ac:/# df -h /data

Filesystem       Size  Used Avail Use% Mounted on

:/nfs-devopsgol   49G     0   47G   0% /data


root@c12ca37057ac:/# df  /data

Filesystem      1K-blocks  Used Available Use% Mounted on

:/nfs-devopsgol  51290624     0  48652800   0% /data

root@c12ca37057ac:/# touch /data/file-test-devopsgol-{1..20}.txt

root@c12ca37057ac:/# cd  /data

root@c12ca37057ac:/data# ls  | grep file-test-devopsgol | wc -l

20

Let's take a closer look at how to use DockerFile generate image  


Step 8 :  Use DockerFile


In the ever-evolving landscape of software development, the utilization of containerization has become paramount. Docker, a leading platform for containerization, empowers developers to encapsulate their applications and dependencies into portable units known as containers. One of the key elements driving this efficiency is the Dockerfile.


Understanding the Dockerfile


A Dockerfile is like a recipe for creating a container. It consists of a set of instructions that Docker follows to build a container image. Absolutely, let's dive into a simple example of a Dockerfile for a Nginx 

application:


Use DockerFile

FROM ubuntu

MAINTAINER DevopsGol <admin@devopsgol.com>


RUN apt-get update

RUN apt-get -y install apache2

RUN echo "DockerFile test on nginx" > /var/www/html/index.html


EXPOSE 80

CMD ["/usr/sbin/apachectl", "-D", "FOREGROUND"]

Build image from dockerfile

devopsgol@an-docker:~/dockerfile-devopsgol$ docker  build -t webserver-nginx-devopsgol .

Output to Image docker 

$ docker image ls |  grep webserver-nginx-devopsgol

webserver-nginx-devopsgol        latest             2410f1abd822   4 days ago    233MB

Create a container after successfully creating image from Dockerfile 

$ docker run -d  -p 6969:80 --name webserver-devopsgol --network app-network webserver-nginx-devopsgol

c1cabf3d070b72151f86c8a977499e05f6475c5ce51a23ee3b0841a6b47fd689

Ensuring Your Container is Up and Running

$ docker ps  -a | grep webserver-nginx-devopsgol

c1cabf3d070b   webserver-nginx-devopsgol    "/usr/sbin/apachectl…"   5 minutes ago    Up 5 minutes    0.0.0.0:6969->80/tcp, :::6969->80/tcp   webserver-devopsgol

test connection port from container 

$ curl 10.20.40.45:6969

DockerFile test on nginx


Conclusion: Venture with Confidence!

Docker might seem intimidating at first, but with perseverance and improved understanding, you can overcome all obstacles. So, venture into the Docker world with confidence, making your applications more efficient and manageable.


FAQs (Frequently Asked Questions)


What is Docker?


Docker is an open-source platform for packaging, shipping, and running applications using containers.


How do I install Docker?


Visit the official Docker website and follow the provided installation guide.


Why is Docker important for beginners?


Docker provides space efficiency and incredible application portability, making it important for beginners.


What are the main benefits of using Docker?


Key benefits include space efficiency and incredible application portability. How to overcome difficulty understanding container concepts?


With time and practice, understanding of container concepts will improve.